Reliable WiFi Webcam (or small cam)
-
@Marci i totally appreciate your help and hints. and i´m really sorry if i insulted you or anyone of the pro´s with my previous message. but we sometimes (designers & coders) do speak a different language. I know i could learn a lot from google and platforms. But sometimes i´m lacking time according to other duties.
bestp. -
Heh - ditto - Am the full-time data manager at a local college, and exams season is upon us...! Isadora’s really just a side-line hobby cash top-up in my spare-time... no way I could make my full-time wage out of it.
-
If there are specifics that you think I should cover in a tutorial, please let me know. I am happy to do so.
recently the TCPI-IP actors have been updated, so there are now additional controls available (giving you better control) But I think that tutorial is still pretty much correct, and should walk you thru some of it. -
@DusX I downloaded printed and worked my way through your Tutorial but far from understanding
 Especially the use of it. What would trigger my parameters (like pan/tilt) of my motor galileo? Or how would i adjust whatever parameter from Isadora with this method?best wishes
 -
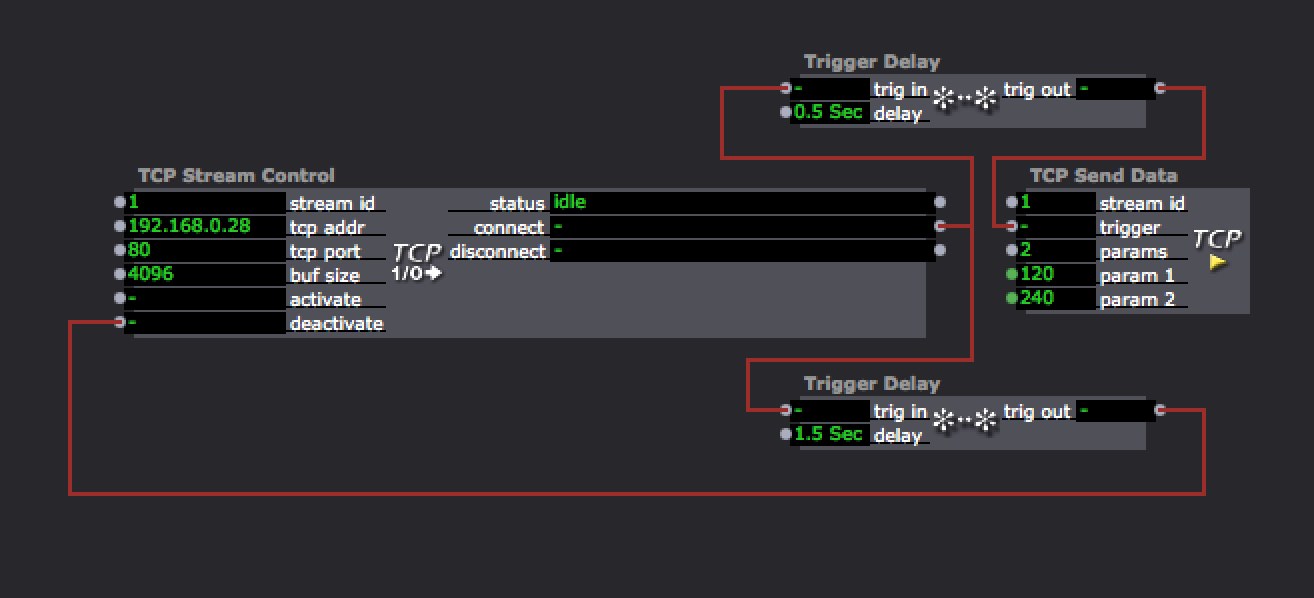
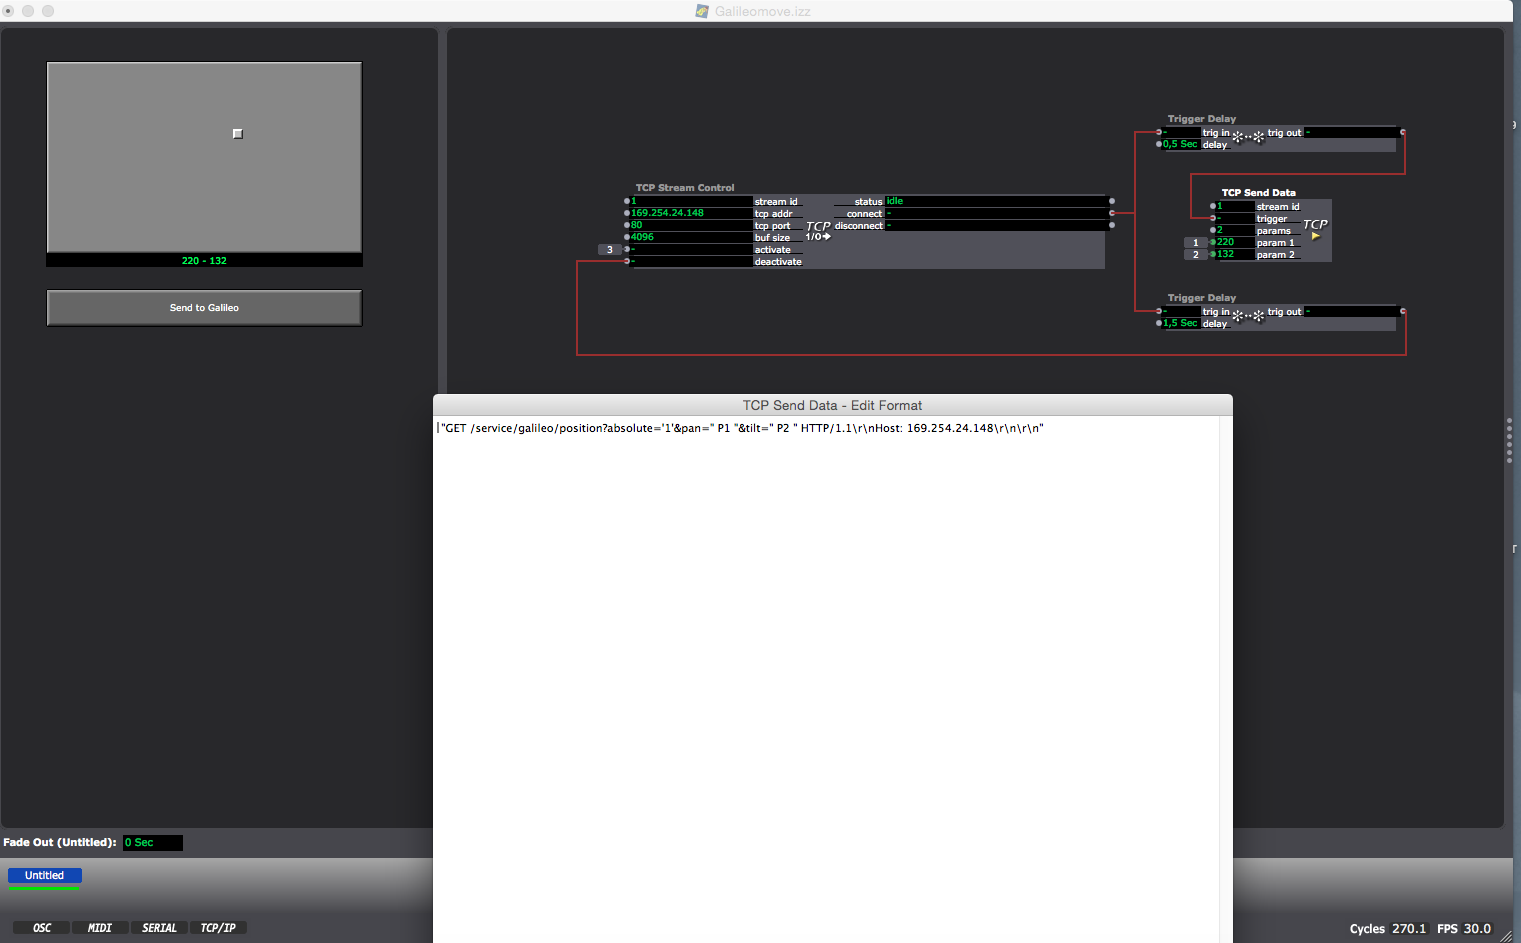
Okey-dokey. Here goes... this handles panning and tilting. From my post above, the URL to control this via a web browser (ie: copy and paste it into the address bar of a web browser on any machine on the same network as the iPhone, and hit go) is:http://192.168.0.28/service/galileo/position?absolute='1'&pan=90&tilt=90This will set the Galileo to 90 degree clockwise rotation pan, and 90 degrees vertical rotation tilt.In the above URL, the TCP address is 192.168.0.28 _(replace this everywhere in this post with the ip address of your iPhone running Airbeam - this should be displayed on the phone when you first start up the camera in the instructions along the top of the screen - **Browser via: [address]** or something like that)_.As it's a bog standard web address using http, the port is 80 by default._[Bonus info: If the address began with https, then we'd be using port 443 by default. If the web address featured a colon thusly: http://192.168.0.28:8080/ then the device is running it's webserver on a non-standard port - in this case the port would be the value after the colon... 8080]_Armed with those two bits of info, add a **TCP Stream Control** actor... and fill in the **tcp addr** field (your iPhone’s ip address) and **tcp port** field (80).Looking at the rest of the web address, there are 3 variables contained in it... **absolute**, **pan** and **tilt**. We want to manipulate pan and tilt.Add a **TCP Send Data** actor. We need 2 params, one for pan and one for tilt, so set it’s **params** to 2.Make sure you have the information pane open on the righthand side of Isadora (View > Information from menus across top), then when you hover over the TCP Send Data actor, it'll state in the info pane that to set the formatting, double click the TCP icon in the Send Data actor... so let's do that now.We've already dealt with connecting to the http://192.168.0.28 part of the web address with the TCP Stream Control actor. We now need the rest, so, in the editing box of the TCP Send Data actor, referring to the DusX tutorial for making a HTTP request, you want the following..."GET /service/galileo/position?absolute='1'&pan=" **P1** "&tilt=" **P2** " HTTP/1.1\r\nHost: 192.168.0.28\r\n\r\n"From the information pane, you'll have gathered that whatever figure you supply to the first params field of the Send Data actor is accessible via P1, and the next via P2 and so on. Compare what we've put in the TCP Send Data box vs the URL address... we've substituted the fixed pan value of 90 for parameter P1, and the fixed tilt value of 90 for parameter P2.Now, add a **Trigger Delay** actor, and set the Delay to **0.5**. Connect the '_connect_' output of the TCP Stream Control actor to the input of the trigger delay. Connect the output of the trigger delay to the trigger input of the TCP Send Data actor.Finally, add a second **Trigger Delay** actor. Connect the ‘_connect_' output of the TCP Stream Control actor to it's input. Set it's delay to **1.5** seconds. Connect it's output to the '_deactivate_' input of the TCP Stream Control actor.Set **param 1** & **param 2** values of the TCP Send Data actor to a number between 0 & 360 (as we're talking degrees of rotation).Click the '**activate**' input of the TCP Stream Control actor to fire the request off.This will: establish a connection to 192.168.0.28 on port 80 with the TCP Stream Control actor. When the connection is established, it'll send a trigger via the Connect output to the 2x trigger delays, the first of which will wait half a second, then trigger the Send Data actor which will send the HTTP request, and your camera should then move to the pan and tilt position specified. The second trigger delay simply waits a bit longer, then deactivates the connection.Change the param values, hit activate again to send them to the Galileo.Have a look at the other endpoints... and hopefully you should be able to work out how to add Send Data actors for some of the others. You should end up with something looking like the below.You can add a keyboard watcher and connect it to the activate input of the TCP Stream Control actor... or an OSC listener so that you can issue commands to the Galileo from TouchOSC on a second iOS device. You could use eyes++ watchers to manipulate params1 & params2 of the TCP Send Data actor, or take OSC values from a Kinect, to control pan and tilt via the motion of an actors limb... etc etc.Better yet, head to View > Actor/Control split. Add a 2D slider, and a button. You’ll see each item has some numbers in the corner - these are the CtrlIDs. So for the 2D slider, pan is 1 and tilt is 2, and the button would be 3\. Left click once on the word ‘activate’ on the TCP Stream Control actor, and set it’s Ctrl ID link to 3.Left click once on ‘params 1’ in the TCP Send Data actor, set it’s Ctrl ID link to 1, and set ‘params 2’ Ctrl ID link to 2.Dbl click on the 2D Slider, set it’s minimum to 0, maximum to 360, steps to 2, and tick ‘display value’. Click OK.Dbl click on the button, and set ‘Button Text’ to ‘Send to Galileo’. Click OK.Resize the controls as appropriate.Head to Controls > Disable Edit Mode from top menus.Now, as you drag the 2D slider about, you should see the two params of the TCP Send Data actor change. Use the 2D slider to set pan (x axis) and tilt (y axis), then hit the ‘Send to Galileo’ button to issue the new position to the camera.
-
Screenshot of the sketch with controls...

-
Thanks for walk thru. Do you have this device? -
Motrr Galileo? Yup... Got 4x iPhone4S dedicated to 4x Galileo 30pin - they started popping up cheap on eBay the day they brought out the Bluetooth version. I prefer the old 30pin as everything can be powered via USB rather than relying on batteries. The iPhone4S's were all grabbed for next to naff all when work upgraded upper management to 5S's... otherwise they were just headed to a skip. They're incredibly useful!
-
@Marci Thanks to your detailed description and support i finally managed to move the galileo and syphon airbag into isadora. works great but only param2 is responding. what did i do wrong. i tried the
motrr app and it take pan and tilt. so the tool is working. i attached my patch and a screenshot. maybe you have an explanation.bestps: already in the browser it moves only in 1 direction! -
If the url in a browser will only move it in one direction, there is a issue with the urlLooking at your patch, everything looks good to me. Except that the single quotes around 1, probably are not needed.I would remove these in the browser and test again. -
Absolute positioning moves in one direction to the specified position. Use camera co-ordinate url or incremental url instead to move relative to the camera centre. Take everything I’ve posted and experiment using the various different URL structures in the post further up til you find the right combination to fit what you want to do.
ie: Take:"GET /service/galileo/position?absolute='1'&pan=" **P1** "&tilt=" **P2** " HTTP/1.1\r\nHost: 192.168.0.28\r\n\r\n”And experiment with replacing absolute=‘1’ with convert=‘1’, or removing absolute=‘1’& altogether so the Stream Control line reads:"GET /service/galileo/position?pan=" P1 "&tilt=" P2 " HTTP/1.1\r\nHost: 192.168.0.28\r\n\r\n”...and experiment with positive and negative values for P1 and P2.The single quotes around absolute=‘1’, convert=‘1’ etc are correct and definitely required. These are all lifted direct from Airbeam’s own web interface JS library. -
Hello
I've just got a Galileo from ebay after discover from this thread.Bad news is that it got discontinued after my order, it's not possible to download the Motrr app anymore...Anyway, I downloaded Airbeam so I can connect to the galileo through it.But I think i've have the same problem than @gapworks . The "tilt" parameter only is responding (but i can move it both direction: clockwise and counterclockwise). Also the "Tilt" function is actually working as a Pan...Did you get more lucky with that ? -
@Maxime Not yet as i am touring, But working on it as soon as i can as i need it for a production. My main goal is where do you get the Information "what to shoot as a http request ;(
I can `shoot`now but ?!? -
@gapworks I had some "improvements" with the situation:If I use the incremental version of the position it works fine, even from Isadora, and the commandes appears to be in the good order as in:"GET /service/galileo/position?pan=" **P1** "&tilt=" **P2** " HTTP/1.1\r\nHost: 192.168.0.28\r\n\r\n"But still no change for the absolute positioning (which is the feature I would like to use...)So to me I would really think there's something with the airbeam version or the Motrr SDK version they are usingI have Airbeam v 2.1.4 (build5)Since it seems to work properly for you @Marci , I'm curious to know which version you're using
